I’ve been so excited to do this project! We had just went to the pumpkin patch in the early part of the week and I could just barely wait to paint those pumpkins 🙂 I headed to Hobby Lobby to pick up my supplies for this project. I opted for a pearl finish, metallic silver, antique gold and midnight blue craft paints. These were 30% off at the time (making them about $1.15 each). I also grabbed a cute stencil in the same isle for $2.99 ( I will use this for lots of other projects!) I browsed the ribbon for something that really stood out to me. I didn’t find the exact color I was looking for, so I went with this navy blue and white design that will go well with my paint colors ( originally $3.99 but I used a 40% off coupon, making it $2.42).
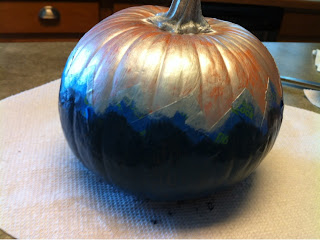
Once I was back home, I grabbed a painters tarp and my two large pumpkins and headed to the deck. I sprayed these with a cheap, white spray paint I bought at Walmart previously for $.97. While those were drying, I grabbed a few paper towels and small tupperware lids and got to work. I like to use the tupperware lids for my paint because they wipe clean really easy and you can re-use them over and over! I started my first pumpkin with the chevron design. I used about a 1.5 inch piece of painters tape cut in half to arrange the design. The first color I used was the metallic silver, and I brushed it over the entire top of the pumpkin including the stem. I did the top of my small pumpkin with the silver as well. Once the silver was (somewhat) dry, I painted the bottoms with midnight blue. I grabbed one of my large pumpkins I sprayed white and tapped a stencil “R” in the middle. Let me tell ya, stenciling a pumpkin was a little bit of a booger! Any who, I also used the midnight blue for this; carefully remove your stencil. Feeling a bit discouraged from the previous stencil, I gave it another go and taped the designed stencil next to the “R”. For this, I used the antique gold paint and carefully filled in the entire stencil, removed and did it to the other side.
I was so anxious to see how my chevron pumpkin turned out, I started to remove the tape… It started to pull the paint off 🙁 Oh well, it’s not the end of the world and I decided to just go over it will the antique gold to blend it all together. I also painted one other medium pumpkin I had with the gold, as well as the middle of my small pumpkin. Next, I went back to my large initialed pumpkin and began to use the pearl finish as a glaze over the entire pumpkin. It gave it a beautiful glow!
I finished the pumpkins off by embellishing them with the ribbon I picked out! This project took me some time, but I’m happy with how there turned out! They aren’t perfect, but I didn’t expect them to be 🙂


Sharing this project on these lovely sites! Thanks for hosting ladies 🙂