Hey, hey it’s Friday! How excited are you? I’m stoked!
It was nice to have an extra day with Labor Day this week 🙂
I’m in full swing of everything Fall! Are you too?
More than likely in the next few weeks, I’ll be sharing my favorite Fall pins!
Follow along with me as I share my favorite from this week!
1. Creating an inviting entry is something I try to focus on everytime I decorate! I love this over-decorated Fall front porch! Typically, I wouldn’t put this much “stuff” on my porch at once, but I think it really works together nicely! We always seem to buy an abundance of pumpkins and I always pick up one too many mums (wink!)
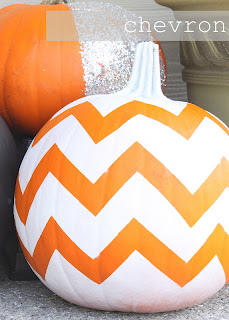
2. I love seeing all the creative ways to decorate pumpkins rather than the traditional carving. I’ve never been good at carving, so I would normally just leave them plain. I love the use of vintage keys spelling out the word F-A-L-L here! Very creative and rustic, I love it ♥ ♥
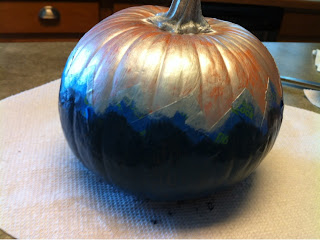
3. Painted pumpkins, you’ve stole my heart ♥ I painted pumpkins for the first time last year and loved how they turned out! Anytime we had guests over, they raved over them! They were appealing and out of the norm. I went with bright colors last year, but I’m loving these metallic tones! I can’t wait to get working on this years pumpkins to share with you all!
4. Isn’t this magical? A complete picturesque picnic setting! How fun would it be to plan a spontaneous lunch date with the kids and pitch a spot in the woods or a romantic dinner with your hubby?! I love the thoughts of this! It would also make the perfect scene for a engagement or family photo shoot, sigh!
All of this weeks pins were sourced from my Pinterest page with unknown original sources.
{ I Need Your “Likes” !! }
I’m SUPER excited.. My painted pumpkins are on Country Livings Pinterest page and I need you all to go and LIKE my pumpkins! If I get the most likes I win a $500 gift card to Michaels!! Thanks so much for your support 😉
{ Fotini Roman Etna, Ohio }
Pretty, Painted Pumpkins
I’ve been so excited to do this project! We had just went to the pumpkin patch in the early part of the week and I could just barely wait to paint those pumpkins 🙂 I headed to Hobby Lobby to pick up my supplies for this project. I opted for a pearl finish, metallic silver, antique gold and midnight blue craft paints. These were 30% off at the time (making them about $1.15 each). I also grabbed a cute stencil in the same isle for $2.99 ( I will use this for lots of other projects!) I browsed the ribbon for something that really stood out to me. I didn’t find the exact color I was looking for, so I went with this navy blue and white design that will go well with my paint colors ( originally $3.99 but I used a 40% off coupon, making it $2.42).
Once I was back home, I grabbed a painters tarp and my two large pumpkins and headed to the deck. I sprayed these with a cheap, white spray paint I bought at Walmart previously for $.97. While those were drying, I grabbed a few paper towels and small tupperware lids and got to work. I like to use the tupperware lids for my paint because they wipe clean really easy and you can re-use them over and over! I started my first pumpkin with the chevron design. I used about a 1.5 inch piece of painters tape cut in half to arrange the design. The first color I used was the metallic silver, and I brushed it over the entire top of the pumpkin including the stem. I did the top of my small pumpkin with the silver as well. Once the silver was (somewhat) dry, I painted the bottoms with midnight blue. I grabbed one of my large pumpkins I sprayed white and tapped a stencil “R” in the middle. Let me tell ya, stenciling a pumpkin was a little bit of a booger! Any who, I also used the midnight blue for this; carefully remove your stencil. Feeling a bit discouraged from the previous stencil, I gave it another go and taped the designed stencil next to the “R”. For this, I used the antique gold paint and carefully filled in the entire stencil, removed and did it to the other side.
I was so anxious to see how my chevron pumpkin turned out, I started to remove the tape… It started to pull the paint off 🙁 Oh well, it’s not the end of the world and I decided to just go over it will the antique gold to blend it all together. I also painted one other medium pumpkin I had with the gold, as well as the middle of my small pumpkin. Next, I went back to my large initialed pumpkin and began to use the pearl finish as a glaze over the entire pumpkin. It gave it a beautiful glow!
I finished the pumpkins off by embellishing them with the ribbon I picked out! This project took me some time, but I’m happy with how there turned out! They aren’t perfect, but I didn’t expect them to be 🙂
Sharing this project on these lovely sites! Thanks for hosting ladies 🙂
{ Painted Pumpkins }
Feeling a little bit giddy about my next project… Painted pumpkins, eek! I really love pumpkins and this year I have the desire to go outside-the-box and personalize them! Painting pumpkins can be a fabulous way to let your creativity shine. No matter your style: spooky, retro, eclectic, or glam, use your favorite colors and designs and get to creating!
I can’t wait to share my project with you this weekend! In the mean time here (below) is where I’m getting some of my inspiration from 🙂
![]() |
Anyone Can Decorate |
![]() |
Alabama Living |
![]() |
Dearest Someday |
![]() |
Alisa Burke: Redifine Creativity |
Feeling Lovesome |