Home

Farmhouse Chic Blog

Taking expensive ideas & turning them into my own ideas!

  • Home
  • About Me
  • Blog
  • Featured On
  • Media Kit

Lovely Burlap Wreath

October 12, 2012 by Fotini Filed Under: burlap, burlap craft ribbon, burlap wreath, diy, holiday wreath, wire wreath, wreath 42 Comments

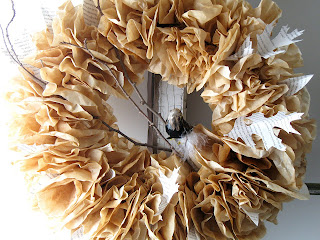
I love meeting new people! A few weeks ago, I got a call from a Mom whose son is in Christian’s class, and she wanted to plan a play date! We met at her house on a Saturday afternoon and chatted while the kids played. I soon found out that she loved crafting too! She showed me some of her fabulous creations, but there was one in particular that I fell in love with. It was a beautiful, full burlap wreath. We had a great time talking about all things we loved making and scheduled another get together, this time at my house and making that wreath!

Here’s what you’re going to need:

  • 15 yards of  3 inch burlap craft ribbon on spool
  • 18 inch wire wreath frame
  • Scissors
Start by grabbing the end of your burlap and feeding it through one end, leaving about a quarter inch as the ‘tongue’. Be sure to leave about a half inch (height wise) of burlap loops. Continue to weave your burlap through the additional two wires, and twist the bottom a couple times before continuing onto the next section. Continue this three to four times in each section of the wire wreath, pushing the burlap back as you go. This will create the “scrunching” look that makes the wreath look full! Simply cut your burlap free from the spool when done. You can hot glue the loose end on the back or simply tuck it into the wiring. Perfect and fluff in any desired places.
I am so happy with how this turned out! It’s so beautiful to look at and a cinch to make 😉 I plan on adding some removable embellishments that I can swap out for each holiday! I’ll update when that time comes…
Sharing this project on these fabulous sites!

Charming Fall Banner

October 5, 2012 by Fotini Filed Under: banner, book pages, diy, diy project, fall, fall banner, fall leaves 96 Comments

I’ve, slowly but surely, finished my Fall mantle! And thanks to my charming fall banner, it now looks complete 🙂 I found this wonderful idea for this banner at Simple As That- The Blog. Please be sure to take a look at hers, too! Ours are very similar, as I’m sure yours will be if you re-create it too. So, lets get to it.. Here’s what you’re going to need:

  • Unused book, at least 10 pages ripped out
  • leaves ( real or fake )
  • craft glue
  • scissors
  • double sided tape
  • jute
For this project, I used 10 pages. Begin by trimming your pages to your desired size and cut a pennant shaped design at the bottom. /  When trimming your pages, keep in mind you will be folding over the top, so leave about a half inch for this. Once your pages are trimmed and cut, begin to glue on your leaves. I opted for fake leaves. We don’t have very many trees around us and I wanted to be able to re-use this next year! I bought mine at Jo Ann Fabrics ( 30 pieces for $1.99 ). You can use your desired craft glue, I just used Elmer’s because it’s what I had around 😉 Let dry. Measure how long your jute will need to be. I left about two inches on each end of mine and about a half inch in between each page. Fold the top of your page over the jute about a half inch, and use a piece of double sided tape to adhere. Continue for your remaining pages. Hang and you’re done!!
I just love it!
Sharing this project on these lovely sites! 

Pretty, Painted Pumpkins

September 21, 2012 by Fotini Filed Under: arts and crafts, craft paint, diy, fall, home decor, painted pumpkins, pumpkins, stencil 50 Comments

I’ve been so excited to do this project! We had just went to the pumpkin patch in the early part of the week and I could just barely wait to paint those pumpkins 🙂 I headed to Hobby Lobby to pick up my supplies for this project. I opted for a pearl finish, metallic silver, antique gold and midnight blue craft paints. These were 30% off at the time (making them about $1.15 each). I also grabbed a cute stencil in the same isle for $2.99 ( I will use this for lots of other projects!) I browsed the ribbon for something that really stood out to me. I didn’t find the exact color I was looking for, so I went with this navy blue and white design that will go well with my paint colors ( originally $3.99 but I used a 40% off coupon, making it $2.42).
Once I was back home, I grabbed a painters tarp and my two large pumpkins and headed to the deck. I sprayed these with a cheap, white spray paint I bought at Walmart previously for $.97. While those were drying, I grabbed a few paper towels and small tupperware lids and got to work. I like to use the tupperware lids for my paint because they wipe clean really easy and you can re-use them over and over! I started my first pumpkin with the chevron design. I used about a 1.5 inch piece of painters tape cut in half to arrange the design. The first color I used was the metallic silver, and I brushed it over the entire top of the pumpkin including the stem. I did the top of my small pumpkin with the silver as well. Once the silver was (somewhat) dry, I painted the bottoms with midnight blue. I grabbed one of my large pumpkins I sprayed white and tapped a stencil “R” in the middle. Let me tell ya, stenciling a pumpkin was a little bit of a booger! Any who, I also used the midnight blue for this; carefully remove your stencil. Feeling a bit discouraged from the previous stencil, I gave it another go and taped the designed stencil next to the “R”. For this, I used the antique gold paint and carefully filled in the entire stencil, removed and did it to the other side.
 I was so anxious to see how my chevron pumpkin turned out, I started to remove the tape… It started to pull the paint off 🙁 Oh well, it’s not the end of the world and I decided to just go over it will the antique gold to blend it all together. I also painted one other medium pumpkin I had with the gold, as well as the middle of my small pumpkin. Next, I went back to my large initialed pumpkin and began to use the pearl finish as a glaze over the entire pumpkin. It gave it a beautiful glow!
I finished the pumpkins off by embellishing them with the ribbon I picked out! This project took me some time, but I’m happy with how there turned out! They aren’t perfect, but I didn’t expect them to be 🙂
Sharing this project on these lovely sites! Thanks for hosting ladies 🙂

{ Fall Wreath #2 }

September 14, 2012 by Fotini Filed Under: burlap, burlap bow, crafts, diy, diy fall wreath, dollar tree, fall wreath, michaels, pumpkins 30 Comments

I made my first fall wreath a couple weeks back ( you can view it here ) and I seriously couldn’t wait to make another one! For the price, you really can’t beat playing around and using your creativity! This project cost me a whopping $5! I love it!!

Here’s what you’re going to need:

  • 12 inch grapevine wreath
  • Glue gun, glue
  • Flowers, or Fall leaves
  • Pumpkins ( or preferred decor )
  • Burlap for bow ( this wasn’t included in my cost because I already had it )

Again, my grapevine wreath and all flowers I used were from DollarTree! The orange pumpkins came from Michaels, $1 for a 2 pack. For your flowers, simply pull the flower heads off of the stems and set aside. It’s always a good idea to play around with what you want your design to look like before you begin gluing things into place. Once you’re satisfied, begin gluing your flower pieces in the middle of the wreath and work outward. This will ensure your work from being crooked! Remember, you can add as little, or as much as you want! Use your creativity and have fun 🙂 Once everything is glued into place, it’s time to make your bow! I used ivory burlap for mine. Start by cutting three 2 inch sections of burlap ( or fabric ). With the first piece, tie a knot in the center, keeping the middle loose. Fold the ends into the middle and glue into place. Grab your additional two pieces of burlap and glue the ends together ( forming a loop ). Grab the center of the burlap, fold and glue into place; do this for the remaining piece as well. Make an “X” with those two pieces and put the bow ( the first piece you made ) in the center and glue.

There you have it! It’s honestly, that, simple! You can create wreathes like it’s going out of style now 😉 Give them as gifts, etc!


Sharing this project on these fabulous sites!
 

Up-cyled Play kitchen

September 11, 2012 by Fotini Filed Under: Bejamin Moore, chalkboard, diy, fun for kids, furniture, kids play kitchen, paint, Target, upcyle 36 Comments

I’ve just fell in love with the adorable play kitchens I’ve been seeing all over Pinterest this past year. So, I had the itch to make one for my babies ( along with my hubbies help of course!) This is such a great way to up-cyle that unwanted piece of furniture you no longer need. Whether it be a bookshelf, nightstand, armoire, tv stand, etc! In our case, my Mother-in-law and Father-in-law gave us a media stand (he built it in the 90’s by the way!!) and I knew it would be perfect!
We headed to Andersons and bought Benjamin Moore’s paint in Cumulus Cloud. This is such a gorgeous color! It’s a light gray with a hint of brown, which goes with our decor! I opted for a light color so I could make it ‘pop‘ with the accessories!
Here’s what your going to need for this project:
  • Piece of furniture to up-cyle (as suggested above)
  • Preferred paint
  • Chalkboard paint
  • Circular saw
  • Bowl for sink
  • Caulk/Silicon
  • Scrap wood
  • Wood glue
  • Brushed nickel (or chrome) spray paint
  • 4 knobs/handles
  • Scrap fabric
  • Glue gun, fabric glue, velcro
We did not prime our wood because the paint we bought had a primer already in it! This saved us a little bit of time 🙂 Start by removing any doors and hardware and set aside. My husband used a circular saw to cut a whole the size of the bowl we chose for the sink. He used a heavy duty caulking to attach the bowl. I bought all the supplies (bowl, small tins, silverware and chalk from Target dollar corner!). Let the caulk dry completely. We put two thick coats of paint on the entire piece. I couldn’t be more happy with this color!! While the paint was drying, my husband used scrap wood we already had and began to cut two “J’s” for the faucet and a rectangular piece for the faucet to rest on. He glued the “J’s” together with wood glue and and clamped together until dry. I layed out a piece of cardboard and begin to prime all the hardware, faucet and pieces. After the primer was dry, I used Kyrlon’s Satin Nickel spray paint, two even coats on all the pieces.
Once the cabinet piece we were using as the oven was dry we taped it off and begin to spray it with chalkboard paint. I would recommend two or three light coats of this (follow directions on bottle). We grabbed the two cabinet pieces we were using as the refrigerator doors and sprayed the handles with the satin nickel spray paint as well. We let everything dry completely overnight. The next morning we were excited to get this piece finished, and so were the kids!
We began to reassemble all the cabinets and hardware. We had extra knobs from when we moved into our house that we decided to use. The faucet knobs were yellow and white gingham, so cute! We still needed fabric for the “curtain’s” so we headed to Hobby Lobby and I let my son pick out a piece of scrap fabric he liked. We ended finding a super cute, scrolly design in ivory and orange. It was $2.69 for a 1/2 yard. I also picked up a roll of Velcro to attach to the fabric and cabinet. Once we were back home, I cut the fabric and used fabric glue to secure the loose ends. I used the same fabric glue to attach a piece of the Velcro directly to the fabric, and let dry. Heat your glue gun attach the other piece of Velcro together, and glue the backing generously. Attach this directly to the wood of your kitchen, pressing down until dry. There was enough extra fabric to use as a “dish towel” for the kids to play with!
Just add your accessories and your done! I bought two teal tins for $1 each from Target. One holds the chalk and the other holds utensils. I scored a wire rack from goodwill for .34 cents and spray painted it yellow gold. We also had some play food to add to the fridge, but plan to get more!
This was such a fun project to finish! The kids will have a blast playing with it this Fall/Winter!
The total cost for this project was well under $10 for us. Note, we used a lot of things we already had!


Sharing this project on these lovely sites!

{ Fabulous Fall Wreaths }

August 27, 2012 by Fotini Filed Under: blog love, diy, diy project, fall, fall wreaths, front door decor 18 Comments

This week I will be making a fabulous Fall wreath, I can’t wait to share! I love wreaths.. They dress up the front of your house, and set an impression before your guests even walk into your home! Your possibilities can be truly endless, so have fun and make your front door look fabulous!

Let me just tell you, if you are even some-what crafty, try making your own wreath, you may surprise yourself! Buying wreaths at the store pre-made can be costly! And you can make something just as beautiful at home, for a fraction of the cost!

Here is where I’m getting my inspiration for Fall wreaths this week, enjoy!

Made In A Day

Shanty 2 Chic
Every Creative Endeavor
Keeping up with the times
 
Craftberry Bush
Be different act normal
Better Homes and Gardens


{ Darling, Felt Headbands }

August 23, 2012 by Fotini Filed Under: diy, diy projects, felt headbands, flower headbands, Pinterest 38 Comments

Can I just say, I love crafting!! I love when I have a fab idea, or come across something I can’t wait to make! I love making things for my kids to wear.. I’m already a super proud Momma, but I love to see my kids wearing things I’ve made 🙂

This week, I came across a wonderfully- detailed tutorial for making felt flower headbands on, shad and lizzie blog! I literally couldn’t wait to head to Jo Ann’s and get the supplies! This really couldn’t be simpler! Here’s what you’re going to need:

  • Pre-cut pieces of felt in desired color(s)
  • Elastic ribbon, also in desired color(s)
  • Scissors
  • Glue gun
  • Paper and marker

Jo Ann’s offers pre-cut felt in the craft section, in a variety of colors, and only .34 cents a sheet. One sheet is enough for two headbands! I chose silver grey and tan. In the same section of the store, they have pre-cut elastic ribbon as well. I ended up getting my elastic ribbon from the fabric isle and cut at the counter because I wanted a thinner, white elastic. For this project I only got one yard. That was also enough for two headbands!

Once you’re home, grab a sheet of paper and trace a simple flower design and cut out. This will be your stencil. Trace your stencil with marker five times onto your felt. Cut out each flower. Grab your, already heated glue gun and place a dot in the center of your flower, fold over and press down. Repeat this step for FOUR of your flowers. Save one flower for the end.

Take one folded flower piece and put a dot of glue on the folded edge and place another folded flower in the opposite direction. Alternate for the remaining two flowers. So it will look like this (below).

Grab your last flower and put a glue dot in the middle of the flower and twist the center. This will be the center of your flower. Hold in place until glue has dried and glue to the center of previous flower pieces. Lightly pull felt for desired “look”. You’re almost done!

Grab your elastic ribbon and measure to 12.5 inches for newborn to 3 months and 13 inches for 3 months and older. Put a small dot of glue on one end and overlap about 1/4 of an inch, press down. Cut a circle with the remaining felt from earlier. Place your flower on the front side of the elastic over the seam and glue into place. Glue your circle of felt on the back of the elastic seam.

You’re finished!! I hope that wasn’t too confusing for you to understand! I can’t wait to make more of these 🙂 I will be making these as gifts too.. Soo stinkin’ cute 🙂

Sharing this project on these great linky parties! Thank you for hosting ladies!!
Featured on One Creative Roundup: Felt Food Edition

Monogrammed Canvas

August 15, 2012 by Fotini Filed Under: canvas, diy, diy project, little girls room, monogram, paint, pearls, pink, Pinterest 14 Comments

I have been taking it slow hanging things on the wall at our new house. As for Isabella’s room, the only thing she has hanging on her wall right now is her bow holder! I had a super cute name banner from her first birthday party, hanging above her crib and some how she ripped it down and tore it to shreds (ha!).

We were at Hobby Lobby yesterday and they had their two pack canvases for $5.99. I didn’t know exactly what I was going to do with them but I knew I could do something fun! I bought two packs of scrap booking pearls in large and small. These are already sticky so it would cut out a step for sticking to the canvas! At this point, I had decided I wanted to write her initials with the pearls. Each pack was $2.99.

Once we were home, I wanted to spray paint the canvas pink. I already had Krylon’s Ballerina Slipper in Gloss. I made several even coats on the canvas, and let dry. I played around with so many different designs for this project. I used a beautiful stencil and tried to align the small pearls for the letter, it looked awful… I made a simple “I”, felt too plain… I added a small piece of burlap and added an “I”, didn’t like it… I don’t know what was coming over me, haha! I finally decided to embellish two of the sides with a short and long row of peals and paint her initials, which are ” IRV”. I had a sample of Valspar paint in a beige color. I started with the “R” in the middle of the canvas. I painted right over the stencil, and repeat for the remaining two letters. Once dry, I smudged a little bit of silver paint on the letters to give them a worn look. I put two small pearls between each letter, to act as a period for the initials.

I was happy with the end result, and it only took about an hour to complete!

Sharing this project on these weekly linky parties! Thank you for hosting ladies!

{ Silhouette Onesie }

August 9, 2012 by Fotini Filed Under: diy, diy onesie, onesie, sewing, silhouette, silhouette onesie 40 Comments

I bought this beautiful fabric at JoAnn Fabrics a couple months back, for $1.99! I didn’t know how I was going to use it, but I knew I’d love to make something for Isabella with it! The same time that I bought her ruffle bloomers for her first birthday photo shoot, I bought a beautiful turquoise pair too! The color in my new fabric and the bloomers were a perfect match!!

I’ve been crazy about silhouettes lately.. So classic and fun! I searched google for a little girl silhouette, and found this one (here). Perfect for my little princess 🙂 I edited the size of the image to fit the page, and printed it, then cut it out. Next, turn your fabric over, design side down, turn your picture backwards and trace. Carefully cut your silhouette out. For Isabella’s first birthday onesie I used a fabric glue to attach the fabric, this time I decided I wanted to sew it on instead. This was a little interesting for me, because I’ve sewn very few times in my life! It was family movie night, so I hopped on the couch with my boys and got to it!

Some may not be impressed by it, but I was really excited with how it turned out! I think it’s safe to say this will be a hand-washed item, just in case my stitching isn’t super tough! I can’t wait for her to wear it. I will update with a picture when she does! 🙂

**Update** She wore it yesterday, and I got a few questions as to where I bought it 😉
Shared this project on the weekly linky parties (HERE), thank you so much for hosting ladies!

My NEW “OLD” Bench!!

July 23, 2012 by Fotini Filed Under: diy, diy project, extra seating, rustic bench, rustic wood, sitting bench, wood bench 38 Comments

My husband promised to build a bench for our living room gallery wall (coming soon!). I was very surprised when I came home yesterday to him and our son building it!! He found two aged pieces of scrap wood that were perfect for this project, so that was our inspiration! Using what wood we already had, he came up with the design for the legs, based off of a specific style he was going for. It didn’t really turn out how he predicted, but we were both very pleased with the results!

Here’s what you’ll need:

  • 2 pieces of aged wood (ours came from a skid!) 4 feet by 6 inches by 1.5 inches
  • 1  8 foot piece of 2 X 3
  • 2  8 foot pieces of 2 X 4’s
  • wood screws
  • stain and polyurethane
  • chop saw and table saw
  • sander

First, sand the planks to a smooth consistency. Next, we set the planks side by side and took a measurement. Ours was about 13 inches, width wise. Measure your 2 X 3’s at about 11 inches for your support braces. You will need three. Cut 8 2 X 4’s at 18 inches. Cut 6 2 X 4’s at 3.5 inches. With the 18 inch 2 X 4’s he made a chalk mark for an angle he wanted to make for the legs, then cut with the table saw. Now you will need to measure the angled side of the 2 X 4’s to know how far in to put the braces. Screw into place. Grab the 6 2 X 4’s at 3.5 inches and screw them between your angled legs. Three on each side. These will now be your sturdy legs! Screw into your end braces. Two 2 X 4’s at a 45 degree angle, serve as an additional brace to keep the legs sturdy. You’re almost done! Start staining your piece. We did not stain the top of ours because we loved that natural look. Once you are done staining, add a thick coat, or two! of polyurethane.

And there you have it! A one- of – a – kind piece you’ll have forever! I can’t wait to add some beautiful pillows and my gallery wall to really showcase this piece!!

Sharing this project on:
Six Sisters’ Stuff
The Prudent Pantry
Sumo's Sweet Stuffmop it up mondays
handmade projects
Tip Junkie handmade projects
made in a day
Lil'Luna
The DIY Dreamer
Let's Pour Tea

”Let’s

PhotobucketWhat's cooking, love?
A Crafty Soireemade in a day
IhookedupwithHoHlamespice
The Shabby Nest
the gilded hare
PhotobucketOneCreativeMommy.com
Chic on a Shoestring Decorating
Country Momma CooksPhotobucket
  • « Previous Page
  • 1
  • …
  • 17
  • 18
  • 19
  • 20
  • Next Page »
AntiqueFarmHouse

Archives

Hi! I'm Fotini! Welcome to Farmhouse Chic Blog, it's such a pleasure to have you here!! Let's get to know each other... Read More…

Fotini Roman, Farmhouse Chic Blog is a participant in the Amazon Services LLC Associates Program, an affiliate advertising program designed to provide a means for sites to earn advertising fees by advertising and linking to Amazon.com
© Fotini Roman and Farmhouse Chic Blog, 2010-2015. Unauthorized use and/or duplication of this material without express and written permission from this blog’s author and/or owner is strictly prohibited. Excerpts and links may be used, provided that full and clear credit is given to Fotini Roman and Farmhouse Chic Blog with appropriate and specific direction to the original content.
Enter your name and email and get the weekly newsletter... it's FREE!
I'm so excited you've decided to get the latest from Farmhouse Chic Blog right in your inbox!
Your information will *never* be shared or sold to a 3rd party.