Home

Farmhouse Chic Blog

Taking expensive ideas & turning them into my own ideas!

  • Home
  • About Me
  • Blog
  • Featured On
  • Media Kit

Fall Centerpiece

September 7, 2015 by Fotini Filed Under: fall, home decor, Uncategorized 4 Comments

Hey there friend 🙂 How are you today? I’m excited you’re here! I hope each of you have a wonderful week this week! I have been on cloud 9 decorating for Fall so far! I was absolutely tickled to find a local farm market had pumpkins when we went last week (I’ve been twice now 😉 ). But shh, don’t tell my husband!

Fall decor

I love how easy it is to create a beautiful  Fall centerpiece by incorporating natural elements. The markets are full of cabbages, pumpkins, pears, squash and more! Use those unexpected items to create something breathtaking! Choose a color or theme you want for the season and keep it consistent throughout your design. For instance, I love the blue/green, white pumpkins and acorn squash. I love how they all look together and all produce a similar look. I also snagged a head of cabbage for just over a $1, which looks great with this mixture as well!

Folks, I really didn’t do anything spectacular here.. I simply arranged these beautiful pieces and added a few mercury glass votives. Now, tell me that isn’t easy enough? I will be adding more and staging the table as well, but as for now I’m enjoying this simple beauty <3

Fall decor

Fall decor

Fall decor

Thank you so much for stopping by! Come back again soon 🙂

Sharing on these blogs!

Fab Pins of the Week!

August 28, 2015 by Fotini Filed Under: fab pins of the week, Pinterest, Uncategorized Leave a Comment

Hello beautiful and happy Friday!! It’s been a beautiful week here in Ohio… The temps have resembled Fall, and it makes me crave the change of the season! I cannot imagine living in a place without the change in seasons. Fall is my absolute favorite time of the year! I love everything about it… The crisp temperatures, distinct smells, rich colors, cozy sweaters, tasty lattes, falling leaves and pumpkins; to name a few! 

Fall

So, incase you hadn’t guessed it yet, I’m sharing a little Fall inspiration with you this morning! Just enough to get you completely in the mood to pull out the Fall decor (if you haven’t already!). You can thank me later 😉

source

source

source

source

source

source

Fall

source

source

source

source

source

Oh my goodness, I am SO ready to decorate for Fall! What do you think, are you ready to bust out the Fall stuff too? I hope you have a great weekend and I appreciate you stopping by today!

Please visit the source links I’ve provided to pin and share!

Follow me on Pinterest!

64pt_pinterest

Ruffle Burlap Banner

October 6, 2014 by Fotini Filed Under: burlap, burlap banner, diy, DIY banner, fall, fall decor, home decor, ruffle burlap banner 11 Comments

If you’ve been following me for awhile, you know two things… I love banners and I love burlap! I meshed those two things together and create a beautiful ruffle burlap banner! The inspiration comes from a few weeks ago being at one of my girlfriends house and seeing her new banner she had just bought at Hobby Lobby. It looked exactly like this, but came with a $15 price tag, which isn’t bad, but I knew I could make it for less!
fall banner
Wouldn’t you know I took the lousiest pictures of the beginning stages of this banner, so I’m going to do my very best to explain it! I used jute for the base. I tied one end to an unfolded paperclip, you could also use a crafting needle if you have one, I didn’t, so I improvised. Grab your burlap ribbon, you can find here, I had a bunch laying around so that’s what I used. Feed your jute needle through the middle of the burlap ribbon and leave about an inch and half – two inches in between and then repeat. Do that until you reach the desired length. I used a good bit of burlap ribbon because I wanted a more tight look. You can fluff and perfect it once you are finished!I love the way it looks! What do you think?

Sharing this project on these lovely blogs!

Cozy Fall Vignette

September 22, 2014 by Fotini Filed Under: cozy corner, decor, diy, fall, fall decor, Fall vignette, home decor, vignettes

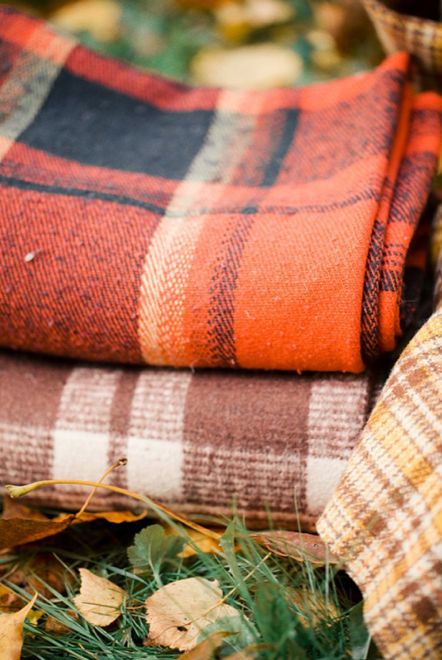
One of my favorite things about Fall is being cozy! Who doesn’t love to snuggle up with a warm blanket and a good book on a chilly night after a long day? That is exactly what inspired this simple vignette!
A few weeks back while shopping at one of my favorite little vintage shops in a local town, I found this old organ bench and snagged it real quick! It will go upstairs in my office eventually, as for now, it’s looking beautiful in my little cozy corner! I love using benches as part of my decor because the length allows you to add additional decor (props), plus the space below allows for decor also. It perfectly fits this round basket for pillows and throws!
 Fall vignetteFall vignetteFall vignette
I just love it! The colors and beauty of fall in such a simple display! So I’m curious, do you create seasonal vignettes? I think it’s a great way to add character to your home and have fun with some of your favorite decor pieces! Thank you for stopping by and I hope to see you back soon!
Sharing this post on these lovely blogs!

Falling In Love ♥

September 8, 2014 by Fotini Filed Under: diy, DIY banner, fall, fall decor, fall in love, home decor

Although Fall doesn’t officially start until the 22nd of this month, I am in complete Fall mode! It is my favorite time of the year! I am absolutely in love with all of the the rich colors, warm tones and fragrant scents, just to name a few! I’m sure you know by now, I’m crazy for banners! So today, I’m sharing this year’s version of my Fall banner!
To start, grab a book that you will never use, or snag one from Goodwill. I chose the phrase “fall in love” for this banner, so I ripped out 9 pages from the book. Before I cut the pages to size, I printed each letter onto them and moved onto the next step. I grabbed my paper cutter and simply trimmed off the sides of each and fishtailed the bottoms by eye. I use jute for the base of my banner and usually, also, eye the length according to the size of the letters. Simply fold the top of each page over and place a piece of double stick tape to the back and press into place. Hang your banner and voila! Such a timeless piece with a statement!

DIY bookpage bannerDIY bookpage bannerDIY bookpage bannerDIY bookpage banner

Sharing this project on these lovely sites!

Fall Home Tour

October 7, 2013 by Fotini Filed Under: diy, fall, fall decor, home decor, home tour, mercury glass, pumpkins 19 Comments

I love decorating for Fall! I adore the rich tones and natural elements. I use real leaves, pine cones, branches and pumpkins (of course!) as often as I can! We’ve already been to a few different pumpkin patches already this season and intend on visiting a few more 😉
Follow along with me as I incorporate a little bit of Fall into my {home}.
{Front Porch}
{Entry Way}
{Formal Dining Room}
{Living Room & Mantle}
{Kitchen}
I just can’t get enough of pumpkins this year! The kids are loving them too so it feeds into my obsession! I’ve also added a few mercury glass pumpkins to my collection that I’m just swooning over ♥  ♥ 
Thank you so much for sticking around and touring my home with me!

Sharing my home tour on these lovely blogs!

Charming Fall Banner

October 5, 2012 by Fotini Filed Under: banner, book pages, diy, diy project, fall, fall banner, fall leaves 96 Comments

I’ve, slowly but surely, finished my Fall mantle! And thanks to my charming fall banner, it now looks complete 🙂 I found this wonderful idea for this banner at Simple As That- The Blog. Please be sure to take a look at hers, too! Ours are very similar, as I’m sure yours will be if you re-create it too. So, lets get to it.. Here’s what you’re going to need:

  • Unused book, at least 10 pages ripped out
  • leaves ( real or fake )
  • craft glue
  • scissors
  • double sided tape
  • jute
For this project, I used 10 pages. Begin by trimming your pages to your desired size and cut a pennant shaped design at the bottom. /  When trimming your pages, keep in mind you will be folding over the top, so leave about a half inch for this. Once your pages are trimmed and cut, begin to glue on your leaves. I opted for fake leaves. We don’t have very many trees around us and I wanted to be able to re-use this next year! I bought mine at Jo Ann Fabrics ( 30 pieces for $1.99 ). You can use your desired craft glue, I just used Elmer’s because it’s what I had around 😉 Let dry. Measure how long your jute will need to be. I left about two inches on each end of mine and about a half inch in between each page. Fold the top of your page over the jute about a half inch, and use a piece of double sided tape to adhere. Continue for your remaining pages. Hang and you’re done!!
I just love it!
Sharing this project on these lovely sites! 

Pretty, Painted Pumpkins

September 21, 2012 by Fotini Filed Under: arts and crafts, craft paint, diy, fall, home decor, painted pumpkins, pumpkins, stencil 50 Comments

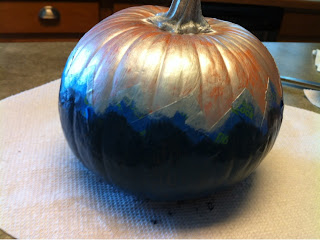
I’ve been so excited to do this project! We had just went to the pumpkin patch in the early part of the week and I could just barely wait to paint those pumpkins 🙂 I headed to Hobby Lobby to pick up my supplies for this project. I opted for a pearl finish, metallic silver, antique gold and midnight blue craft paints. These were 30% off at the time (making them about $1.15 each). I also grabbed a cute stencil in the same isle for $2.99 ( I will use this for lots of other projects!) I browsed the ribbon for something that really stood out to me. I didn’t find the exact color I was looking for, so I went with this navy blue and white design that will go well with my paint colors ( originally $3.99 but I used a 40% off coupon, making it $2.42).
Once I was back home, I grabbed a painters tarp and my two large pumpkins and headed to the deck. I sprayed these with a cheap, white spray paint I bought at Walmart previously for $.97. While those were drying, I grabbed a few paper towels and small tupperware lids and got to work. I like to use the tupperware lids for my paint because they wipe clean really easy and you can re-use them over and over! I started my first pumpkin with the chevron design. I used about a 1.5 inch piece of painters tape cut in half to arrange the design. The first color I used was the metallic silver, and I brushed it over the entire top of the pumpkin including the stem. I did the top of my small pumpkin with the silver as well. Once the silver was (somewhat) dry, I painted the bottoms with midnight blue. I grabbed one of my large pumpkins I sprayed white and tapped a stencil “R” in the middle. Let me tell ya, stenciling a pumpkin was a little bit of a booger! Any who, I also used the midnight blue for this; carefully remove your stencil. Feeling a bit discouraged from the previous stencil, I gave it another go and taped the designed stencil next to the “R”. For this, I used the antique gold paint and carefully filled in the entire stencil, removed and did it to the other side.
 I was so anxious to see how my chevron pumpkin turned out, I started to remove the tape… It started to pull the paint off 🙁 Oh well, it’s not the end of the world and I decided to just go over it will the antique gold to blend it all together. I also painted one other medium pumpkin I had with the gold, as well as the middle of my small pumpkin. Next, I went back to my large initialed pumpkin and began to use the pearl finish as a glaze over the entire pumpkin. It gave it a beautiful glow!
I finished the pumpkins off by embellishing them with the ribbon I picked out! This project took me some time, but I’m happy with how there turned out! They aren’t perfect, but I didn’t expect them to be 🙂
Sharing this project on these lovely sites! Thanks for hosting ladies 🙂
AntiqueFarmHouse

Archives

Hi! I'm Fotini! Welcome to Farmhouse Chic Blog, it's such a pleasure to have you here!! Let's get to know each other... Read More…

Fotini Roman, Farmhouse Chic Blog is a participant in the Amazon Services LLC Associates Program, an affiliate advertising program designed to provide a means for sites to earn advertising fees by advertising and linking to Amazon.com
© Fotini Roman and Farmhouse Chic Blog, 2010-2015. Unauthorized use and/or duplication of this material without express and written permission from this blog’s author and/or owner is strictly prohibited. Excerpts and links may be used, provided that full and clear credit is given to Fotini Roman and Farmhouse Chic Blog with appropriate and specific direction to the original content.
Enter your name and email and get the weekly newsletter... it's FREE!
I'm so excited you've decided to get the latest from Farmhouse Chic Blog right in your inbox!
Your information will *never* be shared or sold to a 3rd party.